Seasonal Gardening Guides

Seasonal Gardening Guides: Cultivate Year-Round Bliss

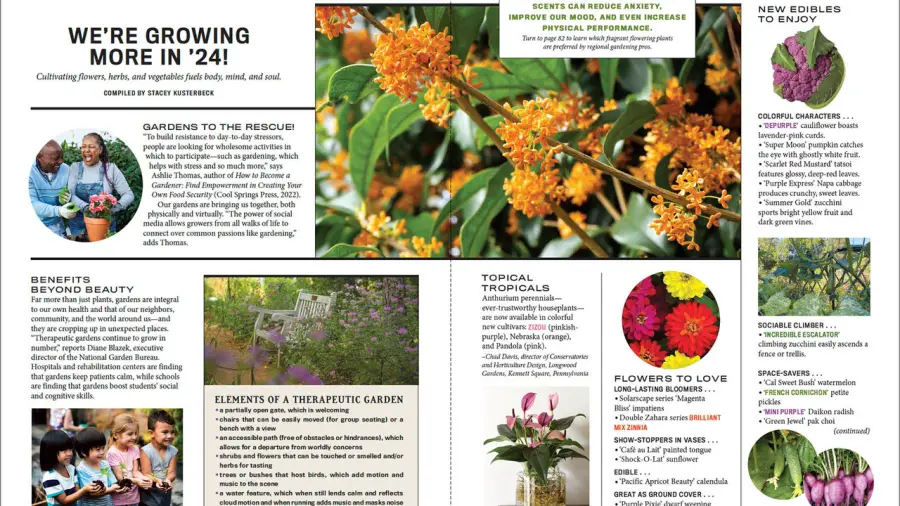
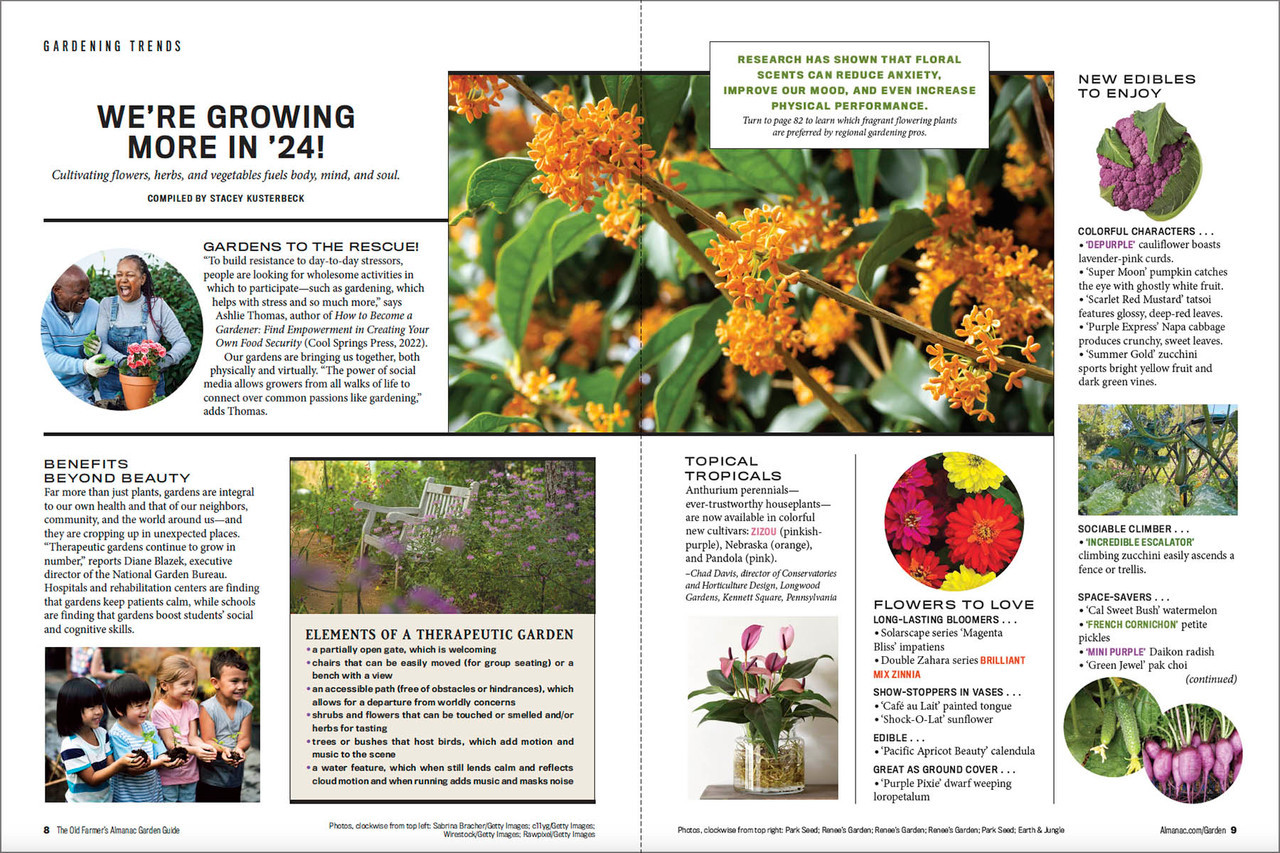
Seasonal Gardening Guides offer region-specific advice for garden maintenance. They align gardening activities with climatic patterns.

Gardening is a year-round activity that varies significantly with the changing seasons. Understanding these seasonal shifts is crucial for maintaining a healthy and vibrant garden. Seasonal Gardening Guides serve as a valuable resource for both novice and experienced gardeners, providing timely tips on planting, pruning, watering, and harvesting.

Tailoring your gardening strategy to the time of year not only ensures your plants thrive but also conserves resources and maximizes your garden’s potential. By embracing the rhythm of the seasons, gardeners can create a harmonious and productive garden that yields the best results year after year. These guides simplify the process, making it accessible for everyone to cultivate a flourishing outdoor space.

Introduction To Seasonal Gardening

Seasonal gardening ties closely with nature’s calendar. It keeps your garden thriving year-round. Gardening through the seasons can be a delightful journey. Plants grow best when they align with the natural cycle.

  • Spring breathes new life with bulbs and seedlings.
  • Summer is for bountiful fruit and vibrant flowers.
  • Fall prepares gardens for rest with hearty vegetables.
  • Winter is a quiet time with evergreens and planning.

Gardening this way brings joy and harmony. One feels connected with earth’s rhythm. Tending a garden brings much peace and balance.

Seasonal Gardening Guides: Cultivate Year-Round Bliss

Credit: blogs.ifas.ufl.edu

Spring’s Awakening: A New Cycle Begins

As spring unfurls, it’s crucial to prime the soil for the upcoming planting season. Enriching the soil with organic compost ensures optimum plant growth. This process nurtures essential nutrients that budding plants need.

Selecting the right plants is key to a vibrant spring garden. Cool-season vegetables like lettuce and peas, along with flowering annuals such as pansies and snapdragons, thrive in milder temperatures. They are perfect to start with.

Effective pest control can safeguard your tender sprouts. Natural options like neem oil or diatomaceous earth keep bugs at bay without harming the environment. These methods are safe for children and pets, making them ideal for family gardens.

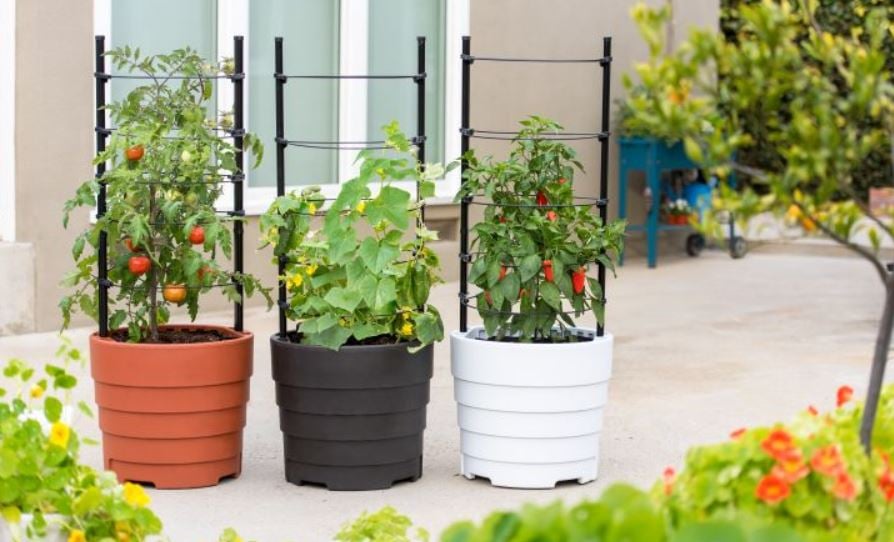
Summer’s Bounty: Peak Gardening Season

Keeping your garden hydrated during the hot summer months is crucial. A smart irrigation approach helps plants stay lush and productive. It’s best to water plants in the early morning or late evening. This lowers water loss from evaporation. Drip irrigation is an efficient method to deliver water directly to plant roots. Mulching reduces water evaporation too.

Selecting crops that thrive in the heat will lead to a fruitful harvest. Tomatoes, peppers, cucumbers, and beans are great choices. They can handle the summer sun. These plants also produce high yields, making the most of your garden space.

Summer brings pests and diseases that can harm plants. Keep an eye out for common issues such as aphids, mites, and blights. Regularly inspect your garden for signs of trouble. Remove affected plants quickly to prevent spread. Natural predators, like ladybugs, can control pests. Use organic treatments to handle outbreaks.

Seasonal Gardening Guides: Cultivate Year-Round Bliss

Credit: store.almanac.com

Autumn’s Harvest: Preparing For Change

Autumn’s Harvest brings a spectrum of bounty. Gardeners should be ready for seasonal changes. Here are concise tips to guarantee a successful harvest:

  • Harvest regularly to encourage more production.
  • Ensure vegetables are dry to prevent mold and rot.
  • Use sharp tools for clean cuts that help prevent plant diseases.

Next, shifting focus to what to plant during these cooler months:

  • Cool-weather crops like kale and spinach thrive in the fall.
  • Root vegetables, such as carrots and turnips, should grace your garden beds.
  • Garlic planted now will yield robust flavors next season.

Finally, protect your garden from the cold to come:

  • Apply mulch to insulate plants from freezing temperatures.
  • Prune perennials for better growth in spring.
  • Empty and clean planters to prevent cracking during the winter.

Winter’s Rest: Garden Downtime

Winter’s garden rest means planning and care. Plants need protection from frost, a key winter challenge. Wrap them in burlap or bubble wrap. Move sensitive potted plants indoors.

Indoor gardening keeps green thumbs busy. Try propagation by cutting. Many plants like succulents and herbs are perfect for this. Use containers with good drainage and fresh potting soil.

Planning for the next season starts now. Sketch garden layouts. Consider crop rotation. Order seeds early. Research new plant varieties. This ensures a head start when warmth returns.

Year-round Maintenance: Tips For Every Season

Maintaining soil health throughout the year is vital for a thriving garden. Regularly test soil composition and enrich with organic matter to ensure optimal fertility. Spring is a good time to add compost to gardens, providing plants with essential nutrients.

Each season requires different pruning tactics. Snip dead or diseased branches to encourage new growth in the spring and summer. Fall and winter months are ideal for significant pruning as plants are dormant. Clear away fallen leaves and debris regularly to prevent disease spread.

Tool care is crucial for garden longevity and safety. Clean and sharpen tools after each use, and store them in a dry, organized space. Oil moving parts to prevent rust and ensure smooth operation.

Climate Considerations: Adapting To Your Environment

Knowing your Hardiness Zone is key for your garden. It tells you which plants survive where you live. The USDA Hardiness Zone map splits North America into 11 zones. Each zone is 10°F colder or warmer in the winter than the next one. This is a tool to help gardeners understand which plants are most likely to thrive at a location.

Plants must suit your local weather. Short, cool summers mean choosing fast-growing vegetables. Wet regions demand drought-tolerant plants. Gardeners can use weather reports and climate data to make smart choices.

Greenhouses and cloches protect plants from cold. Frost cloths and hoop houses are easy ways to extend the season. Planning is vital for gardeners who wish to grow food beyond the usual season. Such structures guard against early frosts and allow for earlier planting in the spring.

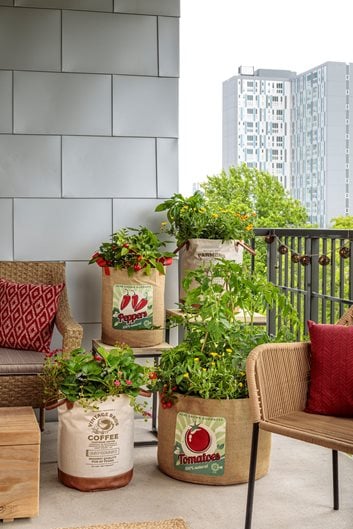
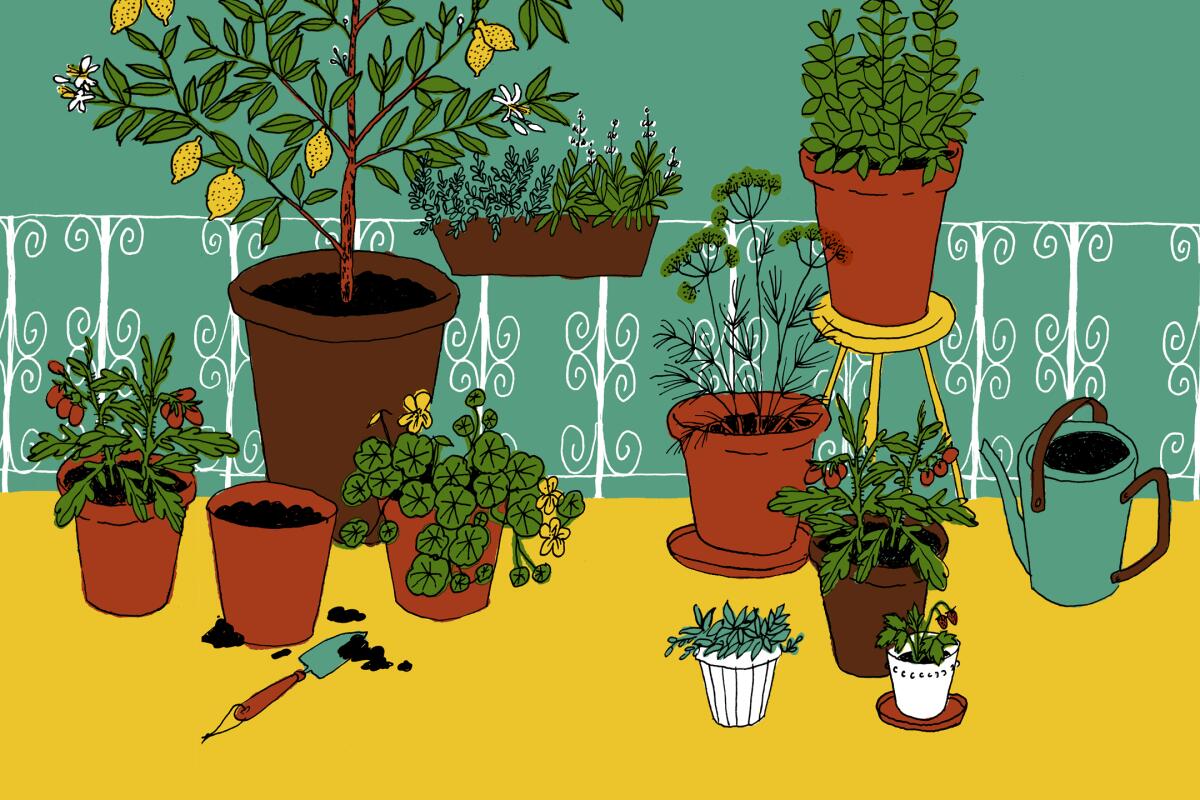
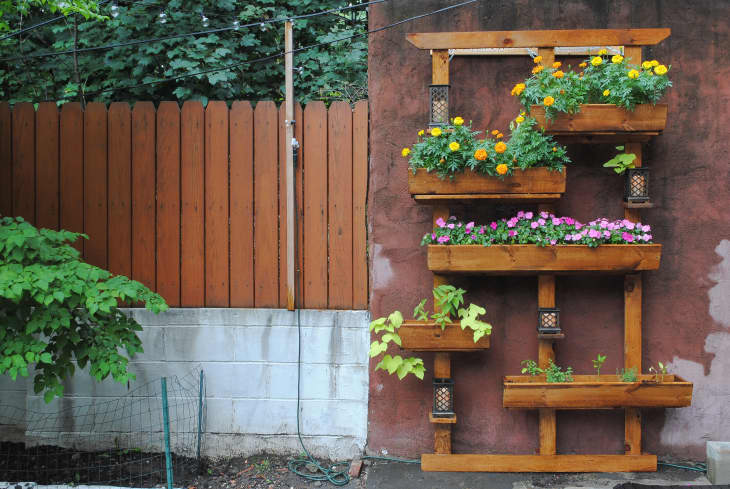
Creative Gardening: Beyond Traditional Methods

Vertical and container gardening transform small spaces into green havens. Pots and hanging planters allow plants to grow upwards, not just out. Walls and balconies become gardens, showing that you don’t need a big yard for plants. This way of planting makes caring for plants easier, too.

Permaculture principles focus on working with nature, not against it. Designing a garden like this means plants help each other grow. It’s about making a mini-ecosystem where everything has a purpose. It saves water and attracts helpful insects.

Using edible landscaping ideas mixes beauty with food. Imagine picking tomatoes from your hedge, or strawberries from your flower bed. This mixes flowers and food crops in a way that looks good and tastes great.

Garden Type Benefits
Vertical Saves space, Easy to manage
Container Portable, Flexible designs
Permaculture Eco-friendly, Self-sustaining
Edible Landscaping Functional beauty, Fresh food

Community And Well-being: The Social Side Of Gardening

Community gardens offer a shared space for growing plants. People from all walks of life come here to grow vegetables, flowers, and herbs. These gardens encourage teamwork and friendship. They create a sense of belonging, especially in urban areas where green space is scarce.

Sharing your harvest brings joy to many gardeners. It could mean exchanging with neighbors or donating to those in need. Each ripe tomato or crunchy carrot can start a conversation, build a bridge, and nourish more than just appetites.

Gardening acts as a peaceful retreat from the bustle of daily life. The simple acts of planting, watering, and soil tending are forms of meditation. They improve mental well-being and offer a sense of tranquility and achievement. Connecting with nature in this personal way can reduce stress and promote relaxation.

Seasonal Gardening Guides: Cultivate Year-Round Bliss

Credit: www.hgtv.com

Frequently Asked Questions For Seasonal Gardening Guides

When Does Spring Gardening Begin?

Spring gardening typically commences once the last frost of winter has passed. This varies by region, but often falls between March and April. It’s vital to consult a local frost date calendar for accurate timing.

What Plants Thrive In Summer Gardens?

Summer gardens are ideal for heat-lovers such as tomatoes, peppers, cucumbers, sunflowers, and marigolds. These plants require full sun and well-draining soil. They thrive in warm temperatures and long daylight hours.

How To Prepare For Fall Gardening?

Prepare for fall gardening by removing spent summer crops and adding compost. Sow seeds of cool-weather vegetables like kale, and lettuce 6-8 weeks before the first expected frost. Mulching helps protect root systems.

Can You Plant Perennials In Autumn?

Yes, autumn is a great time to plant perennials. The cooler weather and warm soil encourage root growth. Ensure plants are established before the heavy frosts begin by planting at least 6 weeks before winter.

Conclusion

As the seasons change, so does the rhythm of our gardens. Each quarter brings its own set of tasks: Spring’s renewal, Summer’s bounty, Fall’s preparation, and Winter’s rest. With our seasonal gardening guides, arm yourself for success in your green space throughout the year.

Happy gardening!

Organic Gardening Techniques

Organic Gardening Techniques: Secrets to Eco-Friendly Growth

Organic gardening employs natural processes to promote plant health and sustainability. It avoids synthetic chemicals, prioritizing eco-friendly practices.

Embracing organic gardening techniques benefits the environment, your health, and the local ecosystem. Key to its success are soil enrichment practices, such as composting and using natural fertilizers, which nourish plants without harmful residues. Crop rotation and the use of heirloom seeds also play crucial roles in maintaining biodiversity and soil health.

Integrated pest management using beneficial insects and companion planting helps reduce disease and pest issues naturally. By nurturing a diverse garden ecosystem, organic gardening aims to create a balance that reduces the need for interventions, fostering a more resilient and productive garden. These mindful methods of cultivation work in harmony with nature, boosting plant growth while conserving resources and supporting pollinators and wildlife.

Organic Gardening Techniques: Secrets to Eco-Friendly Growth

Credit: www.amazon.com

The Allure Of Organic Gardening

The allure of organic gardening reaches far and wide. It is a practice beloved by hobbyists and farmers alike. This trend is growing rapidly. Everyone wants fresher produce and a healthier lifestyle.

Organic gardening promises benefits for both our health and the environment. It gives us chemical-free fruits and vegetables. It also helps protect our earth.

  • Less soil pollution: No harmful pesticides means cleaner earth.
  • Water conservation: Organic gardens often use less water.
  • Biodiversity boosts: These gardens are homes to many creatures.
  • Reduced carbon footprint: No chemicals means less energy used.

Starting Your Organic Oasis

Finding the perfect spot for your organic garden matters. Sunlight plays a big part. Plants love six hours of daily sun. Water sources nearby make watering easy. Quiet areas with less wind protect your plants. Look for natural shelter like trees or fences.

Healthy soil means healthy plants. Start by testing the soil nutrients. Compost enriches the soil naturally. It adds vital nutrients back. Avoid chemicals to keep it natural. Work compost into the soil well. This helps plants to grow strong.

Plant Selection And Symbiotic Planting

Choosing the right plants is vital for an organic garden. Look for species that are well-suited to your local climate and soil conditions. Select plants that have natural resistance to pests and diseases, reducing the need for chemical interventions. Grouping compatible varieties together, known as companion planting, can yield tremendous benefits.

Companion Plant Benefits
Tomatoes Repels pests when planted with basil
Carrots Improves growth when planted near onions
Beans Fixes nitrogen in soil, helping corn

By observing these strategies, you nurture a sustainable ecosystem in your garden. This approach encourages healthy plant growth and a bountiful yield without relying on synthetic aids.

Natural Pest Control Methods

Organic gardening thrives with nature’s own pest control – beneficial insects. These tiny helpers keep harmful bugs in check. To attract beneficial insects, consider planting flower varieties like marigolds and sunflowers. Introducing nativo plants can also bring predatory species to your garden.

For an environment-friendly solution, organic pesticides can be made at home. Effective recipes include a garlic spray or a neem oil mixture. Each pesticide serves different needs. The garlic spray works well against soft-bodied pests. On the other hand, neem oil can handle a broader range of insects.

Application is key – always spray in the evening or early morning to avoid harming beneficial insects. Always follow the recommended concentrations to protect your plants and soil health.

Organic Fertilizers And Soil Enrichment

Organic gardens thrive with rich, nutrient-dense soil. A key method to achieve this is through composting. Simple kitchen scraps such as fruit peels, coffee grounds, and eggshells become valuable compost material. This process turns waste into gold for your garden.

Homemade natural fertilizers are cost-effective and eco-friendly. Eggshell tea, for instance, provides calcium to plants. Banana peels are great for a potassium boost. Meanwhile, fish tank water can be a nourishing treat for your plants without any additional costs.

Fertilizer Type Benefits to Plants
Eggshell Tea Calcium enrichment
Banana Peels Potassium boost
Fish Tank Water Nitrogen source

Water Conservation Techniques

Choosing the right irrigation method is key for water conservation. Drip irrigation delivers water slowly and directly to plant roots. This technique minimizes evaporation and runoff. Soaker hoses are a good choice, too. They let water seep out along their length.

Mulching plays a big part in moisture management. Organic mulches like straw or wood chips should cover the soil. These materials help keep soil cool and retain water. A 3-inch layer of mulch can make a big difference for water retention.

Sustainable Gardening Practices

Crop rotation boosts soil health and prevents pests. Different plants take and add various nutrients. Rotating them stops nutrient depletion. It avoids pest buildup, because pests often target specific plants.

Low carbon gardening involves simple methods. Use hand tools instead of machinery. Composting adds nutrients without chemicals. Planting native species saves water and supports wildlife.

Troubleshooting Common Issues

Organic gardening often encounters problems like diseases and bad weather. Solutions to these can be simple but effective. Natural remedies, such as neem oil and chamomile tea, help fight plant diseases. These options are safe for both plants and humans.

For adverse conditions, like too much rain or drought, mulching and water-wise practices are key. Mindful watering and choosing resilient plants ensure your garden thrives. Remember, consistent care and observation are crucial for an organic garden’s health.

Harvesting And Post-harvest Handling

Organic gardening boosts yield through natural processes. Techniques like crop rotation, composting, and polyculture enrich the soil. These practices reduce pests without chemicals. High-quality, nutrient-rich soil is a cornerstone for increasing harvests organically.

Proper timing is critical for optimal harvests. Picking vegetables at their peak ensures nutritional quality and flavor. Gentle handling is necessary to prevent bruising. Post-harvest, cool and shaded conditions are imperative for keeping produce fresh.

Storing your organic produce requires attention to detail to maintain its benefits. Different vegetables need varied storage conditions. Root crops like carrots and potatoes prefer cool and dark environments. Leafy greens stay fresh in humid and cool storage. Use airtight containers or properly ventilated storage to prolong shelf life.

Organic Gardening Techniques: Secrets to Eco-Friendly Growth

Credit: www.hickorystickbookshop.com

Garden To Table: Enjoying The Fruits Of Your Labor

Organic gardening rewards you with fresh ingredients for delicious recipes. Your vegetable plot’s beans, tomatoes, and herbs can transform into a mouthwatering salad. Imagine taking your sun-ripened strawberries to create a homemade jam that bursts with flavor. It’s a joy to eat food that you have grown yourself.

Sharing your bounty can build strong community ties and enhance well-being. Offer a basket of fresh produce to a neighbor. You might trigger a cycle of sharing and kindness within your community. Gather friends for a meal where everyone brings a dish made from their garden. These gatherings can turn into memories cherished by all.

Frequently Asked Questions For Organic Gardening Techniques

What Is The Organic Garden Method?

The organic garden method involves growing plants without synthetic pesticides or fertilizers, focusing on natural processes and biodiversity to maintain soil health and control pests.

How To Do Organic Gardening?

Start by choosing a sunny spot for your garden. Use compost and natural fertilizers to enrich the soil. Plant native species adapted to your climate. Control pests using organic methods such as beneficial insects. Practice crop rotation and use mulch to manage weeds and retain moisture.

What Is Organic Way Of Growing Plants?

Organic plant growth involves natural processes, without synthetic chemicals. It relies on compost, natural pest control, and heirloom seeds to cultivate healthy plants.

What Is Considered Organic Gardening?

Organic gardening involves growing plants without synthetic fertilizers or pesticides. It emphasizes natural soil enhancement and ecological balance.

Conclusion

Embracing organic gardening enriches both the earth and your table. Practice these techniques to sustain nature’s balance and your health. Remember, patience and persistence reward gardeners with flourishing beds. Start small, dream big, and watch your garden thrive organically! Enjoy the bountiful harvest and peace of mind that follows.

Indoor Gardening Ideas

Indoor Gardening Ideas: Cultivate Your Own Oasis!

Indoor gardening revitalizes living spaces and improves air quality. Explore myriad ideas like potted plants, hanging baskets, or herb gardens.

Bringing nature indoors transforms not only the aesthetics of your home but also contributes to your wellbeing. It’s a hobby that suits people living in apartments or with limited outdoor space. Indoor gardens range from simple windowsill herb setups to elaborate vertical plant walls.

Indoor Gardening Ideas: These green additions purify the air, reduce stress, and can even provide fresh herbs and vegetables all year round. By choosing the right plants for your light conditions and space, you can create a thriving garden inside your home. Keep it straightforward with low-maintenance succulents or make a statement with a large, leafy fern. Indoor gardening offers endless possibilities to blend nature with your decor while fostering a healthier home environment.

Indoor Gardening Ideas: Cultivate Your Own Oasis!

Credit: www.amazon.com

Indoor Gardening: A Personal Oasis

Cultivating your personal oasis with indoor gardening breathes life into urban spaces. This trend transforms homes into lush hideaways. Plants contribute to better air quality and mood elevation. Gardening indoors nurtures a green thumb for city dwellers. It creates a serene corner to relax and reconnect with nature. Through the diligent care of plants, urban gardeners find solace and satisfaction. Each indoor plant becomes part of a unique indoor landscape.

Benefits such as stress reduction are visible with indoor greenery. Caring for plants offers a sense of accomplishment. It requires minimal space and tools but promises immense joy. Indoor gardening is perfect for those lacking outdoor areas. People of all ages can easily enjoy this rewarding hobby.

Choosing The Right Plants

Assessing your space and light conditions is pivotal for thriving plants. Firstly, evaluate the sunlight reaching various areas indoors. Areas with ample light are ideal for most plants. Corners with low light need shade-tolerant species.

For those starting their indoor garden, choosing plants can be exciting. Snake plants and spider plants require minimal care, making them perfect for beginners. Pothos and peace lilies adapt well to indoor environments and are forgiving to novice mistakes. These plants bring greenery indoors and boost air quality, making them great choices. Ensure your plants match the light conditions of your space for best results.

Getting Equipped

Starting an indoor garden requires several essential tools. A good quality soil mix and plant pots are fundamental. Watering cans or drip irrigation systems keep plants hydrated. Fertilizers and pH testing kits ensure optimal growth.

For modern gardeners, innovative gadgets can make gardening easier. LED grow lights support plants without natural light. Smart sensors track soil moisture and sunlight levels. Automated sprouters and hydroponic systems offer advanced growing techniques. These tools streamline the gardening process, making it accessible and fun for everyone.

Indoor Gardening Ideas: Cultivate Your Own Oasis!

Credit: www.apartmenttherapy.com

Design And Layout Ideas

Indoor gardening transforms your home into a lush oasis. Maximize your space by using shelves to layer plants. Shelving allows for multiple levels of greenery. Your walls become gardens with hanging planters. Vertical arrangements draw the eye upward. This creates a sense of height and openness.

Hanging planters work well for small spaces. They leave valuable floor space free. Choose cascading plants like ivy for an added effect. Use sturdy shelves for larger, heavier pots. Ensure they get enough light and air. Design variety keeps things interesting. Mix colors, sizes, and leaf shapes on your shelves.

Soil And Potting Mixes

Finding the right soil mix for your plants is crucial. Plants to thrive need proper soil that holds water well but also drains quickly. DIY soil mix recipes can save money and be tailored to your plants’ needs.

Basic houseplant mix could include one part peat moss or coco coir, one part perlite, and one part compost. Succulent mix might need extra perlite or sand for better drainage. For seed starting, a sterile and fine-textured mix works best.

Plant Type Soil Mix Components
Houseplants Peat Moss, Perlite, Compost
Succulents Coir, Perlite, Sand
Vegetables Compost, Potting Soil, Vermiculite

Always test a small batch before potting to ensure plant happiness. Tailoring soil to each plant’s need leads to lush indoor gardens.

Watering And Nutrition

Irrigation tips for indoor settings should focus on consistency. Watering schedules vary based on plant type and environment. A simple moisture meter can prevent over-watering. Aim for damp, not soggy, soil. Small pots dry out faster, requiring more frequent water checks.

Learning about plant nutrition is key for healthy growth. Plants need the right fertilizers at correct intervals. Too much can harm, and too little can stunt growth. Slow-release fertilizers are great for steady nutrition. Also, use liquid feeds for a quick boost during peak growing phases. Always follow packaging instructions to avoid mistakes.

Lighting Solutions

Natural light and artificial lighting are key for indoor gardens. Sunny windows aid plant growth. Not all homes get enough sunlight. Grow lights can replace sunlight where it’s scarce.

Choosing the right grow lights is crucial for your plants. LED lights are popular for their efficiency and longevity. Fluorescent bulbs work well for small spaces. They have lower heat output.

Lighting Type Benefits Best For
LED Lights Energy-saving, long-lasting Variety of plants
Fluorescent Bulbs Budget-friendly, low heat Herbs, seedlings
HID Lamps High intensity, effective Large gardens

Maintaining Your Indoor Garden

Maintaining an indoor garden requires regular attention and care. Healthy plants need the right amount of water, sunlight, and nutrients. Make sure to check the soil moisture frequently. Your plants may need water when the top inch feels dry. Proper fertilization is also critical for plant growth.

Different plants require different light conditions. Some love bright light, while others prefer shade. Rotate your plants sometimes to ensure they grow evenly. Trimming dead leaves helps prevent diseases. Prune to encourage new growth.

Common pests like spider mites, aphids, and gnats might attack your plants. Use organic pest controls like neem oil or insecticidal soap to treat them. Clean leaves with a soft cloth. This helps to keep pests away. Regular inspection helps spot early signs of diseases. Isolate sick plants to stop the spread.

Incorporating Technology

Indoor gardening reaches new heights with technology. Smart home devices can track moisture, light, and more. Perfect conditions for plants become easy to maintain!

Advanced apps help gardeners stay informed. Think of them as digital green thumbs. They offer valuable tips and reminders to care for your indoor oasis.

Device Function
Sensors Check soil and air
Watering systems Water plants on a schedule
Grow lights Provide necessary light
Apps Guide and educate gardeners

Harvesting Your Success

Indoor gardening lets you enjoy fresh, homegrown produce all year round. Seeing the seeds you planted grow into luscious plants is incredibly rewarding. As your indoor garden blossoms, the time comes to harvest your hard work. Savor the crisp crunch of your salad greens or the juicy burst of tomatoes, right from your living space.

Don’t keep the bounty to yourself! Sharing your harvest with loved ones doubles the joy. Give them a taste of your indoor oasis. Invite friends over for a meal featuring your garden’s yield. Or, gift them a piece of your garden, perhaps a potted herb. It’s a beautiful way to show you care. Your indoor garden becomes a source of nourishment and connection.

Frequently Asked Questions Of Indoor Gardening Ideas

How Do You Start An Indoor Garden For Beginners?

Choose an area with sufficient sunlight or invest in grow lights. Select easy-to-care-for plants and suitable planters. Use high-quality, well-draining soil. Regularly water and fertilize according to plant needs. Monitor for pests and diseases, and enjoy watching your garden grow.

How Do I Turn My Room Into An Indoor Garden?

Choose a room with ample light for your plants. Install grow lights if necessary. Add shelves and plant stands to maximize space. Use pots with drainage to protect floors. Maintain a consistent temperature and humidity level suitable for your indoor garden.

What Are The Methods Of Indoor Gardening?

Indoor gardening methods include container gardening, hydroponics, aquaponics, vertical gardens, and terrariums. Each technique utilizes space efficiently and can support plant growth indoors with proper light and care.

Is Growing Your Own Indoor Garden Worth It?

Growing your own indoor garden offers fresh produce, enhances air quality, and provides mental health benefits. The investment in time and resources can pay off with healthy, accessible greens and the satisfaction of gardening.

Conclusion

Embracing indoor gardening enriches your home with life and color. These ideas can transform any space, regardless of size. Start small or go big, but most importantly, cultivate your green haven today. Let creativity bloom in your personal indoor oasis.

Happy planting!

Cactus Gardening Tools

Cactus Gardening Tools: Must-Haves for Desert Green Thumbs

Essential cactus gardening tools include pliers for handling, pruning saws, and soil knives. While selecting tools, opt for those designed specifically for cacti to ensure safety and precision.

Gardening enthusiasts know that cactus care requires a unique set of tools. These specialized instruments cater to the distinct needs of cacti, allowing for careful handling, efficient transplanting, and precise pruning. Durable materials like stainless steel ensure longevity and effectiveness when working with these hardy plants.

The right cactus gardening tools can transform the challenging task of maintaining a succulent garden into an enjoyable and fruitful endeavor. Whether you’re a seasoned green thumb or new to the world of cacti, investing in the right equipment is key to cultivating a vibrant and healthy cactus collection. With the appropriate tools, gardeners can create a thriving indoor or outdoor cactus landscape that stands out for its resilience and beauty.

Cactus Gardening Tools: Must-Haves for Desert Green Thumbs

Credit: www.finegardening.com

The Art Of Desert Botany

Caring for cacti requires specific tools to ensure safety and plant health. A proper cactus gardening toolkit includes gloves, tongs, and a watering can with a fine nozzle. Gloves protect hands from spines, while tongs are great for handling cacti safely. Use a watering can to control the amount of water delivered to your cacti, as overwatering can lead to root rot.

Soil mix and a scoop are essential for nutritious substrates and mess-free transplanting. For planting, select a shovel or trowel specifically designed for cacti and succulents. They are typically narrower, allowing gardeners to work within tight spaces without harming the plants.

  • Pruning tools, such as scissors or shears, keep cacti in shape.
  • Brushes and blowers are useful for gently removing debris from delicate cactus surfaces.

Prepping Your Soil

Perfect soil mixture is key to healthy cactus growth. Use a special cactus blend or create your own mix. Blend equal parts of sand, pumice, and potting soil. This ensures proper drainage and aeration, vital for cactus roots.

Select containers with drainage holes at the bottom. This prevents waterlogging which can harm the cactus. For extra drainage, add a layer of gravel before adding the soil mix.

Component Purpose Ratio
Sand Improves Drainage 1/3
Pumice Aerates Soil 1/3
Potting Soil Nutrient Base 1/3


Selecting Your Toolkit

Every cacti enthusiast needs a basic set of tools to start a garden. Durable gloves protect from thorns. Long tweezers handle small cacti and
remove debris. Small shovels and rakes are for potting and arranging soil. A pruning saw cuts through thick cactus stems. For larger projects,
grab a hand trowel and garden spade. Quality matters! Your tools should last. Make sure they’re made of stainless steel or other durable materials.

Investing in high-quality tools can make gardening tasks easier and more effective. Consider features like comfortable grips and rust-resistant finishes. Remember to clean and store your tools properly to maintain their condition.


Handling With Care

Gloves and grippers are vital for cactus gardening. Protective gloves shield the hands from sharp spines. Grippers help to handle cacti safely.

To safely repot cacti, the right tools are necessary. Use a small trowel or scoop. Then, gently loosen the soil without harming roots. A spatula may help to remove the plant from its pot.

No need to use a table or bullet points as the provided information fits well into short paragraphs as per the guidelines.

Watering Without Worry

Watering cacti requires precision to ensure plant health. Using the right tools is vital.

To achieve precise irrigation, consider drip irrigation systems. They deliver exact water amounts directly to the roots.

Drip emitters adjust to each plant’s needs, preventing overwatering. Time them to water in early morning or late afternoon.

Moisture meters prevent excess watering by monitoring the soil. Only water when readings indicate the need.

Avoid using large watering cans or hoses. They make controlling the amount of water difficult.

Self-watering probes can be another option. They allow for slow and steady watering.

Cactus Gardening Tools: Must-Haves for Desert Green Thumbs

Credit: www.finegardening.com

Trimming And Pruning Tools

Caring for cacti requires precise tools. Pruning shears are a must. They keep your plants healthy. For small cacti, use scissors.

Gloves protect your hands. They are specially made to resist spines. Long-handled tongs are helpful, too. They can hold cacti while you cut.

Fertilizing The Right Way

Choosing suitable fertilizers for cactus gardening is essential. Organic options like fish emulsion, bone meal, and compost are excellent. These encourage healthy growth without harming the plant. Specialized cactus and succulent fertilizers are also available, with the right nutrient balance.

For application, liquid fertilizers work well. Use diluted solutions to prevent root burn. Granular fertilizers should be spread evenly over the soil. Ensure that none touches the plant directly. Slow-release pellets are another great option.

Type Usage
Liquid Fertilizer Apply directly to the soil
Granular Fertilizer Spread evenly and water in
Slow-release Pellets Apply to the soil surface

Decorative Touches

Top dressing with pebbles enhances cactus health and beauty. Small stones protect soil from evaporation and erosion. These layers mimic natural desert landscapes, offering aesthetic appeal and functional benefits.

Selecting decorative pots and planters adds style to your cactus garden. Find ones that provide proper drainage and suit your home’s decor. Mix and match colors and textures for a unique display.

Tool Maintenance

Maintaining your cactus gardening tools is essential for their performance and durability. To start, remove any dirt after each use. This prevents rust and keeps the tools sharp. For deeper cleaning, mix a solution of warm water and mild detergent. Dip a cloth in this mixture and gently scrub your tools. Once cleaned, dry them thoroughly to prevent moisture damage. Occasionally, apply a disinfectant spray to kill off any lingering bacteria which helps in preventing plant diseases.

For tools with moving parts, like pruners, apply a few drops of machine oil to the joints. This keeps them operating smoothly. Sharpening the blades of cutting tools annually will ensure precise cuts. This simple routine extends the life of your cactus gardening tools, saving money and preventing waste.

Cultivating Expertise

Discover new methods to care for cacti with quality online materials. Internet resources abound, offering detailed guides and expert advice. Online forums and social media groups connect cactus enthusiasts. They help new gardeners learn and veterans to share wisdom.

  • Video tutorials simplify complex topics.
  • Digital books delve deep into cactus care.
  • Blogs offer tips tailored to all skill levels.

For hands-on learning, garden workshops and local plant societies welcome new members. Local nurseries may hold classes. Such gatherings foster community spirit and skill sharing.

Stay aware of events like plant swaps or garden shows. Local libraries can point you to relevant resources. Always seek reputable sources for information.

Cactus Gardening Tools: Must-Haves for Desert Green Thumbs

Credit: www.amazon.com

Frequently Asked Questions On Cactus Gardening Tools

What Tool Do You Use For Cactus?

For cactus care, use specialized tools like cactus pliers, soil knives, pruning saws, and tweezers. Choose tools that safely handle spiky plants and reach tight spaces.

What Is The Best Thing To Plant A Cactus In?

The best medium to plant a cactus in is fast-draining cactus mix soil, ideally in a terracotta or ceramic pot for breathability.

What Do You Use To Pick Up Cactus?

To pick up a cactus, use thick gloves and tongs specifically designed for handling cacti.

Should I Put Pebbles Around My Cactus?

Yes, placing pebbles around your cactus can aid drainage and mimic its natural habitat.

Conclusion

Harness the right tools, and cactus gardening becomes a joy. With specialized pliers, pruning saws, and soil knives, your spiky green friends thrive. Remember, proper equipment means healthy plants and safer hands. So, gear up, get gardening, and watch your desert oasis blossom!

(To learn about How to Get Cactus Green Seeds: https://bonsainurserybd.com/how-to-get-cactus-green-seeds-for-gardening/


Best Gardening Gloves for Handling Cactus

Best Gardening Gloves for Cactus: Spiky to Safe

The best gardening gloves for handling cactus offer puncture-resistant materials and extended forearm protection. Leather gloves such as the No Cry Long Thorn Proof Gardening Gloves are a popular choice for their durability and coverage.

Gardeners who engage with cacti need specialized gloves to safeguard their hands from sharp spines. A good pair of cactus-handling gloves should combine comfort, dexterity, and most importantly, protection. The ideal gloves are fashioned from materials tough enough to repel thorns but also supple for easy movement.

Best Gardening Gloves for Cactus: Features such as reinforced palms and fingertips, along with gauntlet-style cuffs that shield the forearms, are vital. These attributes ensure that gardeners can handle even the prickliest cacti with confidence. With numerous options on the market, selecting the right pair involves considering material quality, glove length, and user-specific needs such as size and grip requirements.

Best Gardening Gloves for Cactus: Spiky to Safe

Credit: www.thespruce.com

Introduction To Thorn-resistant Handwear

Handling cacti demands special gloves to protect against thorns. Durable and thorn-resistant gloves shield hands from sharp spines. Choosing the right gardening gloves is crucial for safe cactus handling. Good gloves prevent punctures and provide a secure grip. Key features include reinforced fingertips, padded palms, and extended cuffs for forearm coverage. Reliable gloves offer both comfort and protection.

Brand Size Price Features
Vermont Glove Medium $110.00 Cold Resistant
ULINE X-Large A4 $45.00 Thorn Resistance
GLOSAV Small $15.99 Leather, Thorn Proof
L.L.Bean Large/X-Large $39.95 Durable Fabric
Duluth Trading Company Various $59.95 Gauntlet Gloves

These top gardening gloves are perfect for any cactus enthusiast! Always remember to wear gloves for safe gardening practices.

Material Makes A Difference

Leather gloves offer durability and protection. Tough for handling sharp cactus spines, they are a top choice. Synthetic fabrics may be lighter but can allow spikes to penetrate. Good leather gardening gloves form a thick barrier, guarding against punctures. These natural materials also provide a comfortable fit over time. Unlike synthetic options, leather can conform to hand movements, increasing agility while working. Leather’s breathable nature helps keep hands cool.

Material Pros
Leather
  • Durable and sturdy
  • Resistant to punctures
  • Improves with use
  • Breathable
Synthetic Fabrics
  • Lightweight
  • Easier to clean
  • Less protective against thorns
  • May not last as long

Features Of The Best Gardening Gloves

Gardening gloves designed for handling cactus need to be tough. They must resist sharp spines and protect hands thoroughly. A good pair lasts many seasons, even with frequent use.

High-quality materials like leather or thick, coated fabrics are key. They stop spines from poking through. Stitching must be robust, preventing tears.

Good gloves fit well, allowing for easy movement. They should offer finger flexibility for delicate tasks. Wearing them, gardeners must grip tools and plants safely.

Durability Features Flexibility Features
Resistant materials (e.g., leather) Snug fit with flexible fingers
Heavy-duty stitching Breathable fabric to prevent sweating
Long lifespan with proper care Adjustable wrist closures for secure fit

Gloves For Cactus Enthusiasts

Gardening gloves must protect against sharp spines. Comfort and durability are key for users. Look for thick padding, flexibility, and breathability. Some gloves also offer wrist protection.

Here are a few top choices:

Brand Model Size Price
FEISHDEK Cactus Gloves Small $15.99
G & F Products Long Sleeve Rose Gloves Varies $13.91
NoCry Puncture Proof Varies $17.99

Gloves should fit snugly yet allow ease of movement. Always check user reviews for real-world insights.

Gloves Beyond Cactus Handling

Gardening tasks often require sturdy gloves to protect hands from thorns. Not only cacti, but also roses and berry bushes can pose a prickly challenge. Many gardeners look for versatile, multipurpose gloves that provide both comfort and protection. Leather gloves are highly regarded for their durability and thorn resistance. Synthetic materials offer flexibility and are sometimes combined with leather to enhance gloves.

For rose pruning, consider gauntlet-style gloves that cover the forearm. While handling berry bushes, gloves with puncture-resistant material are ideal. A table to display different types of gloves suited for various tasks could be helpful.

Task Glove Type Material
Cactus Handling Long-sleeved Leather Gloves Leather
Rose Pruning Gauntlet Gloves Leather/Synthetic Mix
Handling Berry Bushes Puncture-Resistant Gloves Synthetic Fibers
Best Gardening Gloves for Cactus: Spiky to Safe

Credit: www.walmart.com

Best Gardening Gloves for Cactus: Spiky to Safe Glove Sizing And Comfort

Select gloves that fit snugly but not too tightly. A proper fit ensures good grip and dexterity. Ensure there is no extra space at the fingertips. This is vital for handling small cactus spines.

Gloves should feel comfortable, with flexible material at the joints for easy movement. Look for gloves with padded palms to cushion hands during long gardening sessions. Make sure the material is durable and puncture-resistant.

Size Fit Tips
Small Check wrist closure for snugness
Medium Enough finger mobility without looseness
Large Avoid bunching; remain comfortable

Care And Maintenance Of Gardening Gloves

Proper care ensures gardening gloves last longer. Remove dirt after use, wiping with a damp cloth. Wash them occasionally with mild soap and dry naturally.

Avoid machine washing as it can damage the material. Keep them away from direct sunlight when drying. This protects the material from fading and becoming brittle.

For storing gloves, place them in a cool, dry place. Ensure they’re fully dry to prevent mold. Flat storage keeps shape and prevents damage. Use a storage bin or hang them in a designated area.

Personal Safety And Handling Tips

Handling cacti requires care to avoid their spines. Use thick gardening gloves made for cactus handling. Grip the cactus from its base. Never grab a cactus by its top.

For additional protective measures:

  • Wear long sleeves to shield arms.
  • Choose gloves with palm and fingertip reinforcements.
  • Ensure gloves extend past wrist for extra safety.

Where To Buy And What To Pay

Finding affordable gardening gloves need not mean sacrificing quality. Online stores like Amazon frequently offer competitive prices. Physical stores may provide opportunities to try them on for comfort. Durable materials like leather often justify higher costs. It’s wise to balance expense with expected glove lifespan. Research reviews to ensure the best value for your money.

User Experiences And Recommendations

Seasoned gardeners praise durable gloves for handling cacti. Many share stories of thorn resistance and comfort. Some gloves stand out to them. Long-lasting leather and flexible fit are often highlights in user reviews.

Gardeners suggest looking for gloves with reinforced fingertips. They find these great for picking up spiny plants. Adjustable wrist straps also get a thumbs up for keeping debris out. Users value gloves with breathable material to avoid sweaty hands.

Glove Brand Material Price (Approx.) User Rating
Vermont Glove Leather $110.00 5/5
FEISHDEK Soft Deerskin $15.99 5/5
L.L.Bean Various Materials $39.95 4/5
Duluth Trading Heavy-Duty Fabric $59.95 4/5
Womanswork Arm Saver Fabric $36.00 5/5

Users often recommend gloves based on specific tasks. Deerskin gloves work well for soft grip and flexibility. For heavier tasks, sturdy leather is suggested. Adjustable cuffs are a bonus for fit and protection.

Best Gardening Gloves for Cactus: Spiky to Safe

Credit: www.amazon.com

Frequently Asked Questions Of Best Gardening Gloves For Handling Cactus

What Gloves Are Best For Handling Cactus?

Thick leather gloves or specialized cactus handling gloves are best for safely managing cacti.

How Do I Protect My Hands From Cactus?

Wear thick, puncture-resistant gloves, like leather or specialized cactus-handling gloves, to protect your hands from cactus spines.

What Type Of Gloves Protect Against Thorns?

Leather gloves and those labeled “thorn-proof” are best for protecting against thorns.

What Gloves To Pick Prickly Pears?

Choose thick leather or rubber gloves with long cuffs to handle prickly pears, ensuring they are puncture-resistant for safety.

Conclusion

Selecting the right gardening gloves for cactus handling is crucial for safety and comfort. We’ve explored a variety of options to suit your needs, from durability to dexterity. Remember to consider the material, fit, and protection level when making your choice.

Your hands are as important as the cacti you cherish, so arm them with the best gloves. Happy gardening, and may your green endeavors be ever safe and enjoyable!

Cactus Gardening Tips

Cactus Gardening Tips: Essential Advice for Thorny Beauty

Ensure proper sunlight and avoid overwatering cacti for thriving growth. Choose well-draining soil and containers with drainage holes.

Cacti gardening is a delightful endeavor for green thumbs looking for a low-maintenance yet exotic addition to their plant collection. These resilient plants hail from arid environments, demanding specific care to flourish indoors or outdoors. Understanding cacti preferences for sun exposure, watering schedules, soil composition, and container choices sets the foundation for a thriving cactus garden.

Cactus Gardening Tips: Your cactus’s health depends largely on mimicking its natural habitat, which means plenty of light, sparse watering, and nutrient-rich yet fast-draining soil. Choosing the right type of cactus, adhering to seasonal care variations, and being vigilant about pests and diseases also contribute to a vibrant cactus garden. Whether you’re an experienced gardener or a beginner, cacti offer an array of species to suit various aesthetic tastes and care abilities, making them ideal for anyone seeking to add a touch of desert beauty to their environment.

Cactus Gardening Tips: Essential Advice for Thorny Beauty

Credit: www.southernliving.com

The Allure Of Cactus Gardening

Cacti captivate with their array of shapes and sizes, offering an exotic appeal to any garden. Small round globes, towering columns, and spiraled forms are some examples. Each species flaunts its unique silhouette, transforming spaces with their geometric beauty.

They bloom in stunning colors, with flowers ranging from bold reds and purples to soft pinks and whites. Cactus blooms often appear surreptitiously, adding a pop of color to your green collection. These unexpected blossoms bring joy to gardeners and enhance the plant’s intrigue.

Choosing The Right Cactus

Beginners may favor certain cactus varieties due to their resilience and versatility. The prickly pear and golden barrel are ideal for newcomers. These types provide gorgeous blooms and are less fussy about their environment. Look for cacti with healthy, vibrant spines, as these are usually in good condition.

Finding the right pot size is crucial for cactus health. A pot too large may hold extra moisture, which can harm the roots. A pot too small could restrict growth. The perfect pot should leave about an inch or two of space around the cactus. Ensure it has adequate drainage holes to prevent water buildup. A terracotta or clay pot is often recommended because it wicks away moisture effectively.

Prime Cactus Real Estate

Cacti thrive in bright, sunny spots indoors. South-facing windows are ideal to catch ample sunlight.

Choose airy rooms where air circulation is good. Cacti need fresh air to grow healthy.

Outdoor cacti enjoy partial shade in hot climates. Shield them from intense afternoon sun. Place them in areas with morning exposure.

During summer, give indoor cacti a ‘vacation’ outside. But remember to acclimate them slowly to prevent sunburn.

The Art Of Watering

Proper watering is crucial for cactus health. It’s all about balance. Deep, infrequent waterings are best. Ensure soil is completely dry before watering again. This method encourages strong root growth. Aim to water every 1-3 weeks in warm months, depending on your environment. Winter requires even less—perhaps once a month. Your cactus may need more frequent waterings if the air in your home is dry, or less often if the air is humid.

Over-Watering Consequences
Root Rot Can kill the plant.
Fungus Growth Leads to diseases.
Pests Attraction Pests love wet soil.

Soil And Drainage Essentials

Your cactus thrives with the right soil mix. Cacti require a mix that dries out quickly to prevent root rot. A commercial cactus mix is often best. Blend in sand or fine gravel to improve drainage.

To create optimum drainage, use terracotta pots. They wick away excess moisture. Make sure pots have a drainage hole at the bottom. You can add a layer of gravel at the pot’s base too.

Soil Component Benefit for Cactus
Commercial Cactus Mix Premixed for good aeration and drainage
Sand/Fine Gravel Improves soil structure and reduces wetness
Cactus Gardening Tips: Essential Advice for Thorny Beauty

Credit: www.amazon.com

Sunny Delights And Light Requirements

Cacti need bright sunlight to flourish, but too much direct light can harm them. Placing your cactus in a spot where it gets morning sun and afternoon shade is ideal. This gives it enough light without the intense heat of midday.

To prevent sunburn, gradually introduce your cactus to brighter conditions over several weeks. This allows it to adapt without stress. Glass windows can amplify sunlight; consider a sheer curtain to diffuse intense rays.

For cacti that can’t handle high sun exposure, a well-lit room works well, too. Just make sure to position them close to the light source. Reflective surfaces can also help increase light availability without moving the cactus outdoors.

Feeding Your Spiky Friends

Cacti thrive with the correct nutrients. Specific cactus fertilizers are best. They have lower nitrogen content and enriched with phosphorus and potassium.

Feed your cacti in their growth period, usually from spring to early fall. Once a month is enough. In winter, stop fertilizing; cacti are dormant then.

Tackling Cactus Pests & Diseases

Protecting cacti from pests requires consistent attention. Spider mites and mealybugs are common enemies of these desert plants. Regular inspections help in early detection of such pests.

To prevent infestations, ensure good air circulation around your cacti. A mixture of water and mild soap can act as a preventive spray. Neem oil is also effective against pests.

If pests are present, remove them with a soft brush or cloth. In case of diseases, like fungal rot, reduce watering and improve drainage. Infected areas should be cut off immediately to prevent spread.

The Secrets Of Propagation

Propagation is exciting for any cactus enthusiast. Achieving success requires knowing two main methods: cutting and offsetting, and seeding. Let’s explore both.

To propagate from cuttings, select a healthy section of the cactus. Make sure the tool you use is clean to prevent infection. Cut the piece and let it dry. This forms a callus over the wound. After a few days, place the cutting in dry cactus-specific soil. It will develop roots and become a new plant.

Offsets are baby cacti that grow at the base of a mature plant. Gently twist these off and plant them in dry soil. They will root on their own and grow.

Seeding starts with filling a tray with cactus soil. Sprinkle the seeds over the soil and cover them lightly. Place the tray in a warm, well-lit area. Seeds need moisture, so cover the tray with plastic wrap to create humidity. Once the seeds sprout, remove the wrap and care for them just like mature cacti.

Cactus Gardening Tips: Essential Advice for Thorny Beauty

Credit: www.gardenia.net

Handling And Safety Measures

Protective gear is a must for handling cacti. Gloves must be thick to prevent spines from poking through. Eyes should be guarded with glasses. Long sleeves will protect your arms.

To safely repot a cactus, wrap it in a thick layer of newspaper or foam. This acts like a handle. Gently lift the cactus from its pot and place it in the new one filled with the proper soil mix. Press the soil down gently around the roots, being careful not to damage them.

Seasonal Cactus Care Routines

During summer, your cactus craves more attention. Water frequently but ensure the soil dries completely between soakings. Bright sunlight is crucial, yet too much can harm. Position plants where they’ll get ample morning sunshine.

Light shade during peak afternoon heat prevents burns. Use cactus fertilizer monthly for nutrients.

As winter sets in, cacti enter dormancy. Watering should decrease significantly. Ensure the environment is cool; around 50-55 degrees Fahrenheit is ideal. The goal is to mimic their natural desert chill period.

Do not fertilize during this time. Your cactus rests, preparing for spring growth. Gentle care ensures season-long health and vibrancy for your prickly friends.

The Aesthetic Of Cactus Arrangements

Creating a beautiful cactus display is all about balance and creativity. Begin by selecting a variety of shapes, sizes, and colors to make your composition stand out. Choose containers that complement the cacti’s natural beauty.

Small, shallow pots work well for individual cacti, while larger planters can hold intricate arrangements. Terrariums offer a unique view of cacti, often creating a miniature desert landscape. This glass enclosure showcases the plants from all angles, enhancing the overall aesthetic.

  • Use succulent soil for proper drainage.
  • Arrange cacti with space to grow.
  • Contrast spiky textures with smooth ones.
  • Add decorative stones or sand for a finishing touch.

Common Missteps To Avoid

Many cactus enthusiasts believe cacti thrive on neglect. This is a myth that can harm these plants. Cacti do require regular care and attention. One common mistake includes overwatering. Though they are desert dwellers, their roots need time to dry.

Another misconception is that cacti need scorching sunlight always. While they love light, too much can burn them. A balance of light and shade is ideal for most types. Lastly, not all cacti have the same needs. Research to provide the right soil mix and watering schedule for your specific species.

Joining The Cactus Community

Embarking on your cactus gardening journey? Take the first step by connecting with fellow enthusiasts. Forums and online groups are fantastic for exchanging tips and tricks. Beginners and experts alike share insights that can elevate your cactus game.

Don’t forget your neighborhood – local gardening clubs often embrace cactus lovers. It’s a chance to meet in person and maybe even swap plants. Don’t be shy, these communities are usually keen on helping newcomers.

Frequently Asked Questions On Cactus Gardening Tips

What Are The Tips For Growing Cactus?

Ensure cacti receive ample sunlight, ideally a sunny windowsill. Water them sparingly, allowing soil to dry completely between sessions. Choose well-draining cactus-specific soil. Fertilize during growing season with cactus-formulated nutrients. Repot as needed, allowing space for growth.

What Do Cactus Need To Thrive?

Cacti need bright sunlight, well-draining soil, infrequent watering, and warm temperatures to thrive.

How Often Should A Cactus Be Watered?

Water cacti every 1-3 weeks, allowing soil to dry completely between waterings. Adjust frequency based on temperature and season.

Where Is The Best Place To Put A Cactus?

Place a cactus on a sunny windowsill or an outdoor spot with bright light to ensure proper growth and health.

Conclusion

Embrace the joy of cactus gardening with these essential tips. Remember, less is often more when it comes to watering. Pick soil with good drainage, and locate your thorny friends where sunlight is ample. With the right conditions, your cactus can thrive, bringing a touch of the desert’s unique beauty to your space.

Happy gardening!

Cactus Gardening Ideas

Cactus Gardening Ideas: Chic & Easy Desert Vibes

Create a cactus garden by combining different species and incorporating well-draining soil, ensuring a visually intriguing and low-maintenance space. Consider varying sizes and shapes for a dynamic layout.

Cactus gardening offers a unique approach to green spaces, especially suited for dry, sun-soaked environments. With Austin, Texas’s climate, cacti are an excellent choice for both indoor and outdoor gardening. Promoting a blend of aesthetic appeal and practicality, cactus gardens are increasingly popular among homeowners seeking an alternative to traditional landscaping.

Cactus Gardening Ideas: These resilient plants require minimal water, making them ideal for gardeners seeking to conserve resources. A cactus garden can transform a patio or indoor setting into a desert oasis with the right container, a mix of sand and soil, and proper plant selection. The key is to choose a variety of cacti with different textures, heights, and blooms to create visual interest throughout the year. Essential for the health of these plants is ensuring enough sunlight and avoiding overwatering, a common mistake for beginners. With creativity and some basic care, a cactus garden can be a stunning and sustainable addition to any home.

The Allure Of Desert Landscaping

A desert-inspired cactus garden offers a striking landscape. Plants such as the prickly pear bring a touch of minimalist chic. A well-planned cactus garden requires little maintenance and conserves water.

Embrace the trend by selecting drought-resistant varieties and pairing them with ornamental stones. Enjoy your garden’s beauty year-round with these resilient plants. They thrive in sun-soaked areas, making them ideal for sunny spots.

Feature Benefit
Low Water Usage Conserves precious water resources
Minimalist Design Offers a clean, modern aesthetic
Easy Upkeep Saves time and effort
Durable Plants Survive in tough conditions
Cactus Gardening Ideas: Chic & Easy Desert Vibes

Credit: www.pinterest.com

Selecting Your Cacti

Choosing the right cactus is key for your garden. Consider light and space before planting. Sun-loving cacti thrive outdoors with plenty of light. Indoor varieties prefer bright, indirect sunlight.

Small species are great for indoor spaces. Think about Golden Barrel or Christmas Cactus. For outdoor spots, choose Prickly Pear or Saguaro. They love the sun and grow tall.

Plant Name Indoor/Outdoor Light Needs
Golden Barrel Indoor Bright, Indirect
Christmas Cactus Indoor Low, Indirect
Prickly Pear Outdoor Full Sun
Saguaro Outdoor Full Sun

Designing Your Cactus Garden

Spot selection is key for cactus gardens. Sun-exposed areas suit these desert dwellers well. Aim for six hours of daily sunlight to keep them happy and healthy. Ensure the soil drains well; cacti fear excess water. Mix equal parts of native soil with special cactus mix.

Plant arrangement creates impact. Place taller cacti at the back; shorter ones in front. This creates a layered look for your garden. Use grouping to highlight different species. Keep the thorny ones apart from walkways for safety.

Optimal Planting Techniques

Choosing the right soil mix is fundamental for cactus gardening. A blend of sand, perlite, and compost creates ideal conditions. This ensures good drainage and aeration, which cacti need to thrive.

For planting best practices, use gloves to handle cacti. Place each plant in a hole twice as wide as the root ball. Be gentle when removing cacti from pots. Don’t plant too deep; keep the base level with the soil. After planting, water lightly to help roots settle.

Container Gardens: Chic & Versatile

Selecting containers for your cactus garden is fun! Choose materials that allow breathability like terracotta. Ensure pots have drainage holes to prevent waterlogging. Size matters too – a cactus should fit well without crowding.

Creative container ideas make cacti pop. Try upcycling old teacups or boots for a quirky twist. Go minimalist with simple geometric pots or use hanging planters to save space. Grouping different sizes creates a dramatic effect.

Cactus Gardening Ideas: Chic & Easy Desert Vibes

Credit: www.gardeningetc.com

Caring For Your Cacti

Cacti thrive with the right amount of water and sun exposure. To water wisely, ensure the soil is fully dry before adding more water. This prevents root rot and mimics their natural arid environments. Water less in cooler months and more during growth periods.

For managing sunlight and shade, place your cactus where it will receive plenty of natural light, ideally with direct sunlight for at least six hours daily. Some species may need afternoon shade in extremely hot climates. Use sheer curtains or shade cloth to protect them from harsh rays.

Accessorizing Your Cactus Garden

Accessorize your cactus garden with eye-catching top dressings. Gravel or pebbles shine under the sun, giving your space a desert-kissed look. Use them to fill gaps and border cacti.

Adding natural elements like driftwood can enhance the vibe. Mix in colored sands for a vibrant layer.
These simple touches bring out the beauty in your spiky friends.

Cactus Gardening Ideas: Chic & Easy Desert Vibes

Credit: www.airtasker.com

Co-planting With Cacti

Co-planting with cacti requires selection of sun-loving companions. These plants thrive in dry, well-drained soil. Consider pairing cacti with succulents like agave or sedum.

These companions provide varied textures and colors. Adding small flowering plants like marigolds can also enhance the display. Their blooms attract pollinators, benefiting the whole garden.

Designing a mixed planting scheme involves group plants with similar watering needs. Use rocks and wood for a naturalistic layout. This approach minimizes maintenance and ensures healthy plant growth.

Expanding Your Garden

Propagating your cacti often starts with a simple cut or a leaf. Let it callous for several days before planting in dry cacti mix. Water sparingly and provide ample sunlight. This ensures roots will develop. After some weeks, your new cactus should begin to grow.

Introducing new varieties to your garden keeps it exciting. Choose cacti with different shapes, colors, and sizes to create a dynamic display. Visit local nurseries or explore online stores for unique specimens. Always ensure they can thrive in your local climate and soil conditions. Over time, your collection will blossom into a stunning, diverse display. Remember, patience is key with these slow-growing beauties.

Troubleshooting Common Issues

Cactus lovers often face challenges with pests and diseases. Spider mites and scale can harm your plants. Regularly check your cactus and remove bugs using soapy water or alcohol. Fungal diseases may develop from too much moisture. Ensure proper airflow and reduce watering to prevent issues.

Is your cactus wilting or leaves turning yellow? It could be overwatering or underwatering. Fix overwatering by allowing the soil to dry out and ensuring drainage holes are clear. For underwatering, gradually increase water frequency but don’t soak the cactus. Monitor the soil moisture often for best results.

Frequently Asked Questions On Cactus Gardening Ideas

What Plants Grow Well With Cactus?

Succulents, like aloes and agaves, and drought-tolerant perennials, such as lavender and portulaca, grow well with cacti.

How Do You Set Up A Cactus Garden?

To set up a cactus garden, select a bright, sunny location with at least six hours of direct sunlight. Use well-draining soil, preferably a mix designed for cacti. Arrange plants with space for growth; water sparingly, allowing the soil to dry between waterings.
Add a layer of gravel for drainage.

What Do Cactus Like To Be Planted In?

Cacti prefer to be planted in lightweight, well-draining soil mixtures.

Do Cactus Like Full Sun Or Shade?

Cacti prefer full sun but need protection from intense, direct sunlight.

Conclusion

Embarking on the cactus gardening journey enriches our spaces and spirits alike. By embracing these desert jewels, we transform areas into captivating oases. Remember, simple steps lead to stunning results. Choose your cacti, craft your design, and watch a prickly paradise take form.

Share your creations and inspire others. The world of cactus gardening awaits your unique touch. Happy planting!

(To know more about Cactus: https://bonsainurserybd.com/cactus-wonders-exploring-the-beauty/)

How to Get Cactus Green Seeds for Gardening

How to Get Cactus Green Seeds: Your Garden Awaits!

To acquire cactus green seeds for gardening, buy them online or from a local nursery. Harvesting seeds directly from the fruit of a cactus plant is another option.

Cactus green seeds, a staple for desert gardening enthusiasts and succulent collectors, unlock the wonder of growing these resilient, water-wise plants. Starting a cactus garden requires understanding the right conditions and methods for seed germination and plant care. Whether you are an experienced horticulturist or a hobbyist looking to add some spiky texture to your garden, cactus green seeds can lead to a rewarding experience.

How to Get Cactus Green Seeds: Perfect for arid climates or indoor container gardens, cacti embody the beauty of adaptation. They are resilient, require minimal maintenance, and offer a wide variety of forms and blooms, making them a captivating addition to any plant collection. Starting from seeds allows for a deeper connection with the growth process, and with the right care, you can cultivate a wide array of species.

Cactus Green Seeds 101

Gardening with cactus requires knowledge of the different types of cacti. Each one has its unique seed type. Recognizing cactus varieties is crucial before starting.

Getting the timing right for seed harvest is essential. The best season varies with cactus species. Yet, most seeds are harvest-ready post blooming. This typically happens when the fruit ripens on the cactus.

Cactus Type Season To Harvest Seeds
Barrel Cactus Late Summer to Fall
Prickly Pear End of Summer
Cholla Late Summer
Saguaro Early Summer

Seed Sourcing Strategies

Gardening enthusiasts often face a choice: buy seeds or harvest them. Purchasing seeds is quick and offers variety. Yet, collecting seeds is rewarding and cost-effective. Aim to buy quality seeds for successful growth.

Exploring online stores and local nurseries brings many options. Online retailers provide convenience and sometimes rare species. Local garden shops support community and offer hands-on advice. Remember to check the seeds’ origin and quality before buying.

Finding organic or heirloom seeds ensures pure strains. It is essential for maintaining diversity. Gardening forums and social media groups are useful for tips on where to find the best cactus green seeds.

Pre-harvest Considerations

Gardening enthusiasts should note the flowering process of cacti for successful seed harvesting. Look for flowers that have bloomed and faded, as they are often precursors to fruit development. Ripe cactus fruit tends to sport a vivid hue and a slight softness upon gentle pressure. Gardeners must wait until full ripeness is achieved before attempting seed collection. Ripe fruits are typically easy to detach from the cactus, signifying that the seeds are ready for the next step in your gardening journey.

Harvesting Techniques

Wear gloves to protect your hands from the spines. Carefully remove the seed pods from the cactus. Be gentle to avoid crushing them as the seeds inside are delicate. Use tongs to handle the pods if necessary. Place collected pods into a bucket or container.

Split open the fruit to access the seeds inside. Remove seeds using a spoon or your fingers. Rinse seeds under running water to remove pulp. Let seeds dry on a paper towel for several days. Once dry, store seeds in a cool, dry place until planting.

Post-harvest Seed Treatment

Obtaining cactus green seeds requires a step-by-step post-harvest seed treatment. A key component is the removal of pulp from the seeds. This ensures seeds are clean for optimal storage and future planting. To start, gently scoop the seeds from the cactus fruit.

Next, submerge seeds in water to help separate them from the sticky pulp. Stir the mixture to further loosen any remaining pulp. Once separated, spread the seeds on a clean surface to air-dry. Adequate air circulation is crucial, to prevent mold or decay. Typically, seeds dry within 24-48 hours, depending on humidity levels.

Ensure seeds are completely dry before storing in a cool, dry place.

Starting Your Seeds Right

Soaking cactus seeds increases the chance of successful germination. Begin by placing the seeds in warm water for around 24-48 hours. This process helps break through the tough outer coating, ensuring faster sprouting.

Before planting, prepare the soil by sterilizing it to eliminate harmful bacteria and fungi. You can do this by baking the soil in an oven or using the microwave. Aim for a temperature of about 90°C (200°F) for at least 30 minutes for effective sterilization. After cooling, the soil is ready for your cactus seeds.

Step Action
1 Soak seeds in warm water
2 Sterilize soil by baking


Propagation And Planting

Successful cactus green seed germination requires the right substrate. Use a mix of coarse sand, perlite, and potting soil to ensure good drainage. This combination prevents water from lingering too long, which can rot seeds.

The temperature is crucial for germination and should stay between 20-25°C (68-77°F). Seed trays or small pots can be used for planting. Gently place seeds on the substrate, spacing them out to avoid overcrowding.

Manage moisture by lightly misting the soil with water. Do not drench; you want it to be moist, not soggy. A plastic wrap or a glass pane over the container helps keep humidity high. Ensure to remove the cover for a few hours every day to prevent mold growth.

How to Get Cactus Green Seeds: Your Garden Awaits!

Credit: www.amazon.com

Growing Healthy Cactus Plants

Growing healthy cactus plants begins with proper fertilizing of the seedlings. Use a low-nitrogen fertilizer to avoid burning the delicate roots. A balanced liquid fertilizer, diluted to half-strength, is perfect when applied every four weeks. Once seedlings have established, transplanting them into a larger pot is the next step.

For transplanting, choose a well-draining soil mix and a new pot that is slightly larger than the current one. Gently remove the seedlings, being careful not to damage the roots. Place them in the new pot and backfill with soil mix. After transplanting, provide consistent watering—ensuring the soil stays moist but is not waterlogged.

Aftercare is crucial. Shield the young plants from direct sunlight to avoid scorching. Gradually introduce them to more light over several weeks. Watch for pests and treat them promptly if needed. With the right care, your cactus seedlings will grow into strong, healthy plants.

Troubleshooting Common Issues

Seed germination can be tricky for beginners. First, use fresh seeds, as they have the highest chance to sprout. Soak seeds in warm water for 24-48 hours before planting. This softens the outer shell, promoting root emergence.

Consistent warmth aids germination, so maintain soil temperature around 20°C (68°F). Use a heat mat if necessary. Always keep the soil moist but not waterlogged. A fine spray is ideal to prevent seed displacement.

To prevent fungal diseases, start with a sterile potting mix. Avoid overcrowding by spacing seeds properly. Air circulation is crucial, so ensure adequate ventilation. Cover the seeds with a transparent dome or plastic wrap to retain humidity, but remove it periodically to prevent mildew.

Making Use Of Cactus Green

Gardening with cacti can be a fun and rewarding experience. You need seeds to start.

Get cactus green seeds by picking mature cactus fruits. Cut open the fruit and scoop out the seeds. Rinse the seeds to remove any pulp, as this has growth inhibitors.

After rinsing, spread the seeds to dry. Drying is crucial as it prevents mold growth. Once dry, plant them in well-draining soil. Ensure they get plenty of sunlight.

Cactus greens produce dye too. Cacti blocks can be smelted to make the dye. Use this dye to color various items in crafting projects. It adds a personal touch to your gardening creations.

How to Get Cactus Green Seeds: Your Garden Awaits!

Credit: www.pinterest.com

Frequently Asked Questions Of How To Get Cactus Green Seeds For Gardening

How Do You Get Cactus Seeds?

To obtain cactus seeds, buy them from garden centers or online, or collect them by harvesting ripe cactus fruit, extracting the seeds, and cleaning them thoroughly for planting.

How Do You Harvest Cactus Fruit Seeds?

To harvest cactus fruit seeds, slice the fruit open, scoop out the pulp, separate seeds from the pulp, rinse them thoroughly, and let them dry before storing or planting.

How Long To Soak Cactus Seeds Before Planting?

Soak cactus seeds for 24-48 hours before planting.

How Do You Get Prickly Pear Seeds?

To obtain prickly pear seeds, cut open the fruit, scoop out the seeds, clean them thoroughly to remove pulp, and allow them to dry before planting.

Conclusion

Gardening enthusiasts, take note: growing cactus from green seeds can be a fulfilling project! Armed with the right knowledge and supplies, you can embark on this botanical journey. Remember, patience and proper care are key in nurturing these desert gems.

Get ready – your green thumb could soon be accentuated with a touch of desert flair!

(To learn more about Cactus: https://bonsainurserybd.com/cactus-wonders-exploring-the-beauty/)

Balcony Gardening Vegetables

Balcony Gardening Vegetables: Thrive in Small Spaces!

Balcony gardening allows you to grow a variety of vegetables in limited space. Choose plants that thrive in containers and consider sunlight exposure.

Balcony gardening offers the joys of growing your own food without the need for a traditional garden space. With the rise of urban living, cultivating vegetables on your balcony has become a practical and enjoyable pursuit. It’s important to select the right containers and soil mix to ensure your vegetable plants have a healthy foundation.

Balcony Gardening Vegetables: Opt for vegetables that are known to perform well in pots, such as tomatoes, peppers, leafy greens, and herbs. Ample sunlight is crucial, so arrange your pots to maximize light exposure. Regular watering and fertilization will keep your plants vibrant, but beware of overwatering, which can be just as detrimental as drought. By embracing vertical gardening techniques, you can maximize yield even in the smallest of spaces. With these considerations in mind, balcony gardening can provide fresh, home-grown vegetables throughout the growing season.

Balcony Gardening Vegetables: Thrive in Small Spaces!

Credit: m.youtube.com

The Lure Of Balcony Vegetable Gardening

Balcony gardening allows city dwellers to enjoy homegrown vegetables. Even with limited space, a variety of veggies can thrive. Tomatoes, peppers, and herbs are perfect for balcony environments. By using containers and vertical garden techniques, a small area becomes an efficient food-producing space. With simple tools and basic maintenance, you can harvest fresh veggies. This approach to gardening is a key part of the urban green movement. Embracing it contributes to better air quality and a healthier urban lifestyle. Transform your balcony into a mini vegetable oasis today!

Choosing Vegetables For Your Balcony

Choosing the right vegetables for your balcony garden is crucial. Space is often limited, so it’s important to think smart about what you grow. Small pots are perfect for herbs like basil and chives, which don’t need much room. For those with a little more space, tomatoes and strawberries can thrive.

Opt for compact varieties such as bush beans and dwarf peppers that don’t sprawl. Certain vegetables like lettuce and radishes are quick to harvest, giving you more yield in a short time. Vertical planters can maximize your growing area for climbers like peas and cucumbers. Remember to choose plants based on sunlight availability and container size for best results.

Maximizing Space With Smart Design

Smart design transforms your small balcony into a lush vegetable garden. Vertical gardening tactics allow you to grow more in less space. By stacking pots or using trellises, you can grow upwards. This method is perfect for crops like tomatoes, beans, and cucumbers.

Exploring container options is key to a successful balcony garden. Innovative containers like hanging baskets and railing planters make the most of limited space. These options provide extra room for plants to thrive without crowding the balcony floor.

Balcony Gardening Vegetables: Thrive in Small Spaces!

Credit: www.gardeners.com

Soil And Fertilizer Fundamentals

Mixing the perfect soil is key for balcony gardening success. Vegetable plants need the proper nutrients to grow. Start with a good quality potting mix, rich in organic matter.

Organic fertilizers, like compost or manure, are great. They release nutrients slowly. Synthetic fertilizers give quick nutrient boosts. But, they can harm the environment.

Soil Component Organic Fertilizer Synthetic Fertilizer
Nutrient Release Slow and steady Fast and intense
Environment Impact Low Potentially high
Soil Health Improves over time May degrade with overuse

Watering Systems For Balcony Gardens

Efficient irrigation techniques are key for healthy balcony gardening vegetables. Self-watering planters offer a great solution. They use reservoirs to store water. This way, plants get water when they need it. This method reduces the hassle of daily watering. It also helps in saving water.

These planters can be a DIY project or bought ready-made. They can vary in size. This depends on the type of vegetables you want to grow. Tomatoes need bigger planters than herbs, for example.

  • Check water levels weekly to ensure plants have enough.
  • Use quality soil that retains moisture well.
  • Adjust the water based on the season and plant type.

Sunlight And Shade Management

Understanding the light needs of your plants is key for balcony gardening. Vegetable plants need the right balance of sunlight and shade for optimal growth. Group plants with similar light requirements together to make the best use of your space.

To create microclimates, use items like trellises or taller plants to provide shade. This strategy helps in managing the sunlight that reaches your different vegetable varieties. Considering the position of the sun during the day will aid in deciding where to place your plants for adequate sunlight exposure.

Plant Type Sunlight Needs Shading Method
Leafy Greens Partial Shade Use Taller Plants
Fruiting Vegetables Full Sun Open Space or Top Tier
Root Vegetables Mixed Sun Plant in Rows

Pest Control In Confined Spaces

Organic Pest Management Strategies help keep bugs away. Use neem oil to fight pests. Spray neem oil on plants every week. Neem is safe for both plants and humans.

Make garlic or chili spray at home. Blend garlic or chilies with water. Spray this mix on your balcony vegetables. It stops bugs from eating your plants.

Grow companion plants like marigolds. Marigolds look nice and scare pests away. They protect vegetables by keeping bugs away. Some herbs also help. Plant basil or mint to guard against insects.

Balcony Gardening Vegetables: Thrive in Small Spaces!

Credit: www.gardendesign.com

Harvesting Your Balcony Bounty

Timing for peak freshness in balcony gardening vegetables is key. Pick your veggies when they’re ripe for the best taste. Check for bright colors and firm texture.

For tomatoes, wait until they’re red on the vine. Lettuce peaks when leaves are full and green.

Post-harvest handling matters too. Rinse your veggies under cool water. Dry them gently with a towel. Store most vegetables in your fridge. Some, like tomatoes, are best kept at room temperature.

Winter Balcony Gardening Tips

To extend your balcony vegetable garden into the cooler months, consider season extension techniques. Insulating plants with burlap or fleece can shield them from frost.

Cold frames and cloches also offer extra warmth and protection. Utilizing these methods can help your veggies thrive despite chilly temperatures.

Select vegetables that naturally endure cold spells for a robust winter balcony garden. Spinach, kale, and Swiss chard withstand frost. Also, root vegetables like carrots and beets can handle cooler weather. Choosing these plants ensures a bountiful harvest throughout the winter.

Community And Social Benefits

Balcony gardening vegetables brings people together. Gardeners often share their plentiful crops with friends. Neighbors get to enjoy fresh produce too.

Sharing the Harvest isn’t just about the food. It’s about forming connections and spreading joy.

Meeting others who love plants is exciting. Connecting with other Urban Gardeners creates a community. They swap tips and support each other.

  • Trade vegetables and enjoy a variety of flavors.
  • Learn and grow together as gardening pals.
  • Community events can start from small balcony spaces.

Frequently Asked Questions For Balcony Gardening Vegetables

What Veggies Can You Grow On Your Balcony?

You can grow a variety of vegetables on your balcony including lettuce, tomatoes, peppers, radishes, and herbs like basil and parsley. Opt for containers or hanging pots to maximize space.

What Vegetables Are Good For Terrace Garden?

Tomatoes, bell peppers, cucumbers, leafy greens, and herbs thrive in terrace gardens. These vegetables are well-suited for container growing and require minimal space.

Can I Start A Garden On My Balcony?

Yes, you can start a garden on your balcony. Choose appropriate-sized containers and plants suited for the space and lighting conditions. Ensure proper drainage and care for your balcony garden to thrive.

What Vegetables Can I Grow On My Porch?

You can grow various vegetables on your porch, including tomatoes, lettuce, peppers, radishes, and herbs. Choose containers suitable for the plant size and ensure adequate sunlight.

Conclusion

Embracing balcony gardening starts a journey of color, flavor, and vitality right outside your door. Growing vegetables in your own private nook brings freshness to your plate and beauty to your home. Remember, a splash of sunlight, regular watering, and a dash of care cultivate a lush mini-farm with rewarding harvests.

Start small, grow what you love, and savor the bounty. Happy gardening!

Balcony Gardening for Beginners

Balcony Gardening for Beginners: Cultivate Your Oasis!

Balcony gardening for beginners involves selecting suitable plants and optimizing limited space. It’s an accessible way to cultivate a green thumb in urban settings.

Delving into the world of balcony gardening offers a refreshing escape from the hustle and bustle of city life. It’s an ideal pursuit for those seeking to create a tranquil oasis or yearning to grow their own herbs, vegetables, and flowers.

This pursuit doesn’t require extensive horticultural knowledge; a little dedication and the right guidance can lead to a thriving garden. Proper plant choices, efficient use of space, and consistent care are the keystones of a successful balcony garden. Embracing this green endeavor can provide not only aesthetic pleasure but also the satisfaction of cultivating life in a compact area. Whether it’s your first foray into gardening or you’re looking to adapt your skills to a smaller space, this introduction sets the foundation for a rewarding journey into balcony gardening.

Why Start A Balcony Garden?

Creating a balcony garden breathes life into your urban living space. It’s a touch of nature right outside your door. Green spots in cities are rare. So, growing plants on your balcony makes your home special. Plants in your outdoor area can also clean the air. This makes your home a healthier place.

Not just beauty, but home-grown veggies and herbs have perks. They lack chemicals found in store-bought food. You get to enjoy freshness that lasts. Imagine plucking tomatoes or basil right before dinner!

Benefits of Balcony Gardening
Fresh air and a touch of nature
Less exposure to store-bought food chemicals
Enjoyment from growing your own food
Balcony Gardening for Beginners: Cultivate Your Oasis!

Credit: www.latimes.com

Assessing Your Balcony’s Potential

Assessing your balcony for gardening is a crucial first step. Check how much sunlight your space gets daily. Different plants need different light levels. Sunny balconies are great for flowers and veggies. Shady spaces may suit ferns or ivy better.

Now, consider the size of your balcony. You want to grow a lot but keep enough space to move. Use vertical planters to save floor area. Install shelves on walls for more plants. Pick pots that fit well together. This helps you grow more and keeps your balcony neat.

Light Requirement Plant Type Examples
Full Sun Tomatoes, Roses
Partial Sun/Shade Panies, Begonias
Full Shade Ferns, Ivy
  • Measure your balcony area first.
  • Choose planters that save space.
  • Place tall plants on the back side.
  • Hang plants from the ceiling if you can.

Planning Your Balcony Garden Design

Planning your balcony garden starts with a theme. Choose a style that reflects your taste. You could go tropical, modern, or even edible. Themes guide your choices, from furniture to plants.

  • Start with small plants if you’re a beginner.
  • Pick plants that grow well in your climate.
  • Herbs and flowers are great for starters.

Create a list of plants you love. Think about colors and heights. This list is your plant wishlist. It helps you shop. Remember, not all plants like all climates. Choose plants that can thrive on your balcony.

Balcony Gardening for Beginners: Cultivate Your Oasis!

Credit: medium.com

Selecting Plants For Your Balcony

Selecting the right plants for your balcony requires consideration of the space available. Here are some great options:

  • Herbs like basil and mint are easy to grow and useful.
  • Succulents demand minimal care and thrive in small pots.
  • Flowering plants like petunias brighten up the space.
  • Vegetables such as tomatoes can grow in hanging baskets.

Match plants with the right season. Some flowers bloom well in spring or summer. Keep soil moist and provide proper sunlight. Always check plant tags for care instructions.

Essential Tools And Supplies

Embarking on balcony gardening requires a set of basic tools. A durable pair of gloves protects your hands during work. Pruning shears help keep plants in shape. A watering can with a long spout reaches roots easily. For potting and re-potting, spades and trowels are essential. Use containers with drainage holes to prevent waterlogging. Labels help you track your plants’ growth.

Tending plants demands nutrition and proper soil. Organic soil, rich in nutrients, supports plant health. Fertilizers boost growth, but they must suit the plants’ needs. Slow-release fertilizers nourish plants steadily. For organic options, consider compost or manure. Their nutrients enrich the soil naturally over time.

Container Gardening Basics

Starting a balcony garden requires picking proper containers. Containers come in various materials like plastic, clay, and ceramic. Each has its perks. Plastic is light and cost-effective. Clay and ceramic pots are heavy, offering stability for larger plants.

Proper drainage is crucial. Make sure your containers have holes at the bottom. This prevents water from pooling at the roots, which can cause rot. For potting, use a quality potting mix. It’s designed to keep soil aerated and drain well. Avoid using garden soil; it’s too dense for container plants.

Irrigation And Watering Tips For Healthy Plants

Creating a watering schedule for your plants is crucial. Different plants need different amounts of water. For example, cacti require less water than tomato plants. It’s best to research your plant’s specific needs.

Succulents thrive with weekly watering, while leafy vegetables might need water every couple of days. Always check the soil before watering. Moist soil means you can wait, but dry soil calls for hydration.

Self-watering pots and drip irrigation systems are great solutions for consistent watering. They help to keep soil evenly moist and prevent overwatering. Consider installing a simple timer to manage the watering schedule automatically.

Balcony Gardening for Beginners: Cultivate Your Oasis!

Credit: www.amazon.com

Maintaining Your Balcony Garden

To keep your balcony garden thriving, regular upkeep is a must. This includes watering your plants thoroughly but not too much; overwatering can harm them. Make sure to prune your plants regularly to encourage new growth and prevent disease.

  • Check plants weekly for dead or dying foliage.
  • Use sharp pruning tools for clean cuts.
  • Remove yellow leaves promptly to keep plants healthy.

Pest control also plays a pivotal role. Natural options like neem oil or insecticidal soaps work well against pests. Always inspect leaves for bugs and treat them quickly. Remember, healthy plants resist pests better.

Pest Natural Remedy
Aphids Soapy water spray
Spider mites Neem oil treatment

Enjoying Your Balcony Garden Year-round

Balcony gardening thrives with seasonal updates and changes. Choosing plants suited to different times of the year is key. Spring beckons for vibrant flowers, like tulips and daffodils. Summer is ideal for growing herbs and leafy greens. Come autumn, it’s time for chrysanthemums and pansies. Winter may seem bleak, but evergreens and hardy shrubs can survive the chill.

To create a relaxing atmosphere, place comfortable seating and soft lighting. Include a variety of potted plants to enhance the space visually. Incorporate pleasant scents with jasmine or lavender to soothe the senses. Wind chimes or a small fountain can add tranquil sounds. This harmony of elements turns your balcony into a peaceful retreat.

Expanding Your Green Thumb Skills

For those ready to advance their balcony gardening skills, exploring high-level techniques can yield bountiful results. Companion planting is a savvy strategy, ensuring plants that thrive together share space. Vertical gardening is also beneficial, creating room for more greens. Soil amendment practices are vital for optimal plant health and growth.

Access to online forums and communities enriches your gardening journey. Local gardening clubs offer opportunities for exchanging seeds and experiences. Websites are filled with DIY tutorials, while social media groups provide interactive platforms for questions and advice. Use these resources to enhance your balcony oasis.

Resource Type Description
Forums Spaces for sharing tips and solving problems.
Local Clubs Meet and learn from nearby garden enthusiasts.
Social Media Connect with a global network of gardeners.
DIY Tutorials Step-by-step guides for garden projects.

Frequently Asked Questions Of Balcony Gardening For Beginners

What Is The Easiest Plant To Grow On A Balcony?

The easiest plant to grow on a balcony is the cherry tomato, due to its adaptability and minimal care requirements.

What Are The Best Tips For A Balcony Garden?

Select appropriate plants for your climate and sunlight exposure. Use quality, well-draining soil. Utilize vertical space with hanging planters and shelves. Regularly water and fertilize your plants. Ensure sturdy containers to withstand weather conditions.

How Do I Turn My Balcony Into A Garden?

To turn your balcony into a garden, assess the space for sunlight and choose suitable plants. Install planters or pots, add soil and seeds, ensure adequate watering, and monitor plant growth. Use vertical structures for climbing plants to maximize space.

What Veggies Can I Grow On My Balcony?

You can grow lettuce, tomatoes, peppers, herbs, and strawberries on your balcony. Compact, dwarf varieties are best for limited space. Choose containers that fit your balcony size. Ensure adequate sunlight for healthy growth. Regular watering is essential.

Conclusion

Embarking on your balcony gardening journey can transform any small space into a green haven. Start simple, with easy-to-maintain plants, and let your confidence grow alongside your garden. Remember, patience and care are your best tools. Happy planting, and revel in the joy of your blossoming oasis!